Find the essence of the level, turn ideas into reality and push some polygones to make it happen. That’s the short form of our enviroment design. A deeper insight gives our enviroment artist Dominik in our latest blog:
Hi everybody! So today is all about how we at Laserboys3000 build the dark and grimm world of “Quanero 2 – System Release” for you to experience in VR. My name is Dominik and my main responsibility on the project is to make sure that all the environments and locations in which our story takes place in are believable and furthermore visually pleasing to look at. In addition to that I try to keep in mind that an environment should aid the overall story and theme of a game and not the other way around. Today I try to break down the creation process into different steps and stages to show you how we approach and develop environments from start to finish.
Preproduction: Where the essence of the level is found
In the beginning I like to ask important but sometimes boring questions about the location I am going to design. Pre Production for me is all about story, setting, functionality and order. Each location in Quanero 2 – System release serves a unique purpose derived from the storybook. The story lays down the setting of a location and what crucial elements I have to consider and build, but in order to start production I need more in-depth information. This usually starts with me doing a really detailed description of what the area should look like. At this stage many different aspects and possibilities interact with each other and form a detailed picture of what I want an environment to look like in my head. In the process I think about daytime, atmosphere, lighting, weather, surrounding areas and many other factors that influence the appearance and functionality of a location.
Once I got a decent picture of what the finished environment could look like I ask myself even more questions to make the environment pop:
Which aspects of the concept are unique to this locations? Which are generic or overused and should be dropped? Is there enough space for characters to move in a realistic way? Besides the story, what purpose does this location serve? Who lives and works here?
At this stage I like to “overthink” some aspects that may seem ridiculous at first but really aid in believability and realism later on. Another really important aspect is to ask yourself how you want the player to feel while playing this level. What kind of emotions do I want to convey to my audience? This thoughts and questions result in a lot of ideas that now need to be cast in a form. But before I start to block out the space in 3D I tend to spend some time on the visual development of the scene. Here I gather references, concepts and photographs of various sources that inspire me.
Al the thoughts you put into this environmental and visual description of the level will benefit you later on in the designprocces and as they serve you as a valuable foundation to base your decisions on. This is also the part of the process where Art Direction is established. I think it’s really important to get all your ideas, the look and feel you´ve got in your head down on paper and canvas. After all you want to share them with your teammates 😉
Whiteboxing – Where ideas become reality
After we established our ideas and visual goals for the level it’s finally time to jump into unreal engine, YEY! At this stage it´s key to work fast and to iterate without hesitation. I tend to block out several variations that only take me a few hours each. To achieve this I mainly use Geometry Brushes (BSP) inside of Unreal Engine. To me this is the most exciting part of the entire environment creation process as I´ve got a lot of creative possibilities and freedom to find an environmental solution that fits my expectations and also serves the story. It’s like hunting for the best way to layout space. In away it’s kind of magical to me when a location emerges that till that moment only existed in my head.

As the blocking more or less builds the foundation of our entire level it is important to get proportions and composition right at this stage. Big and rough shapes are used in combination with quick lighting to establish the scene and find interesting compositions and different possible variations. Usually i hop in and out of VR while blocking in my ideas. That way I can build a relationship to the spaces created and am able to evaluate them in order to see what feels good and what doesn’t.
While doing so I most often get a feeling on which blockout I want to build on apon. Anyway, most of the time its the one that features unique shapes or something interesting that already sells the scene in this early and rough status.
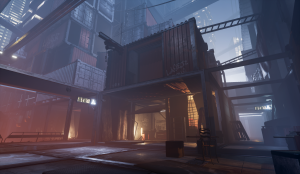
The selected blockout scene receives additional love as I take all the shapes and try to put them into a grid. This way it’s easy for me to dissect the blockout and break it down in a handful of modular environment assets later on. During the blockout stage I usually take a lot of screenshots and do some quick overpaints and photobashes on them to get a feeling for what the location might look and feel like when finished.
![]()
At this point the environment is more or less ready for motion capturing, as all the basic shapes and spaces are already established in the blockout and will remain the same throughout the production.
At the end we got a level ready for production that just needs to be done. We got finished Asset lists and we also got the modeling tasks distributed among our artists.In some way the environment is done and finished at this point . . .all the questions are answered, mood, composition and a rough lightpass are done. All that will happen from now on just makes the level look better.
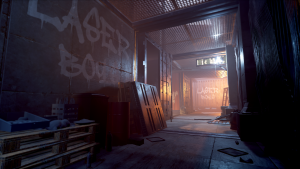
Production – Pushing some polygons and make it happen
Now it’s time to jump into your modeling toolkit of choice and get work done.
This mainly involves the creation of 3D models and materials that will be used to replace the rather boring looking Cubes that we used in the blockout to add detail and realism – piece by piece.
At this point it’s rather important to not lose yourself into fine details of a model. After all it will just be one of many assets that combine to a bigger picture in the end. On my environments I try to focus on the overall picture: The combination of all the modeled assets, placed lights and blocked out composition. It’s not always easy for me to stop working on fancy bevels and booleans on a rather unimportant but beautiful piece of the environment, but jumping between different assets and locations helps to keep a fresh eye on the overall environment and prevents me from investing to much time in details that are not really that important.
At the end I want to invite you to join us on facebook, instagram or steam if you are interested in the creation process. We will keep you posted on our progress and really can’t wait to share the world we created for you!
Stay laser out there, see you soon 😉
